Xero Integration Resources
BOAhub Xero Integration: Streamlining Financial Management
Integrating Xero with the BOAhub transforms your invoicing process, allowing you to seamlessly manage and send invoices directly through the BOAhub platform. This integration streamlines your workflow, enhancing efficiency and accuracy in financial operations. Below, you'll find a collection of resources to guide you through setting up and utilizing the Xero integration with the BOAhub, ensuring you maximize the benefits of this powerful combination.
Here are the resources to help you integrate Xero with the BOAhub platform:
If you're an 'Owner' or 'Admin' on the BOAhub, here's how to integrate Xero.
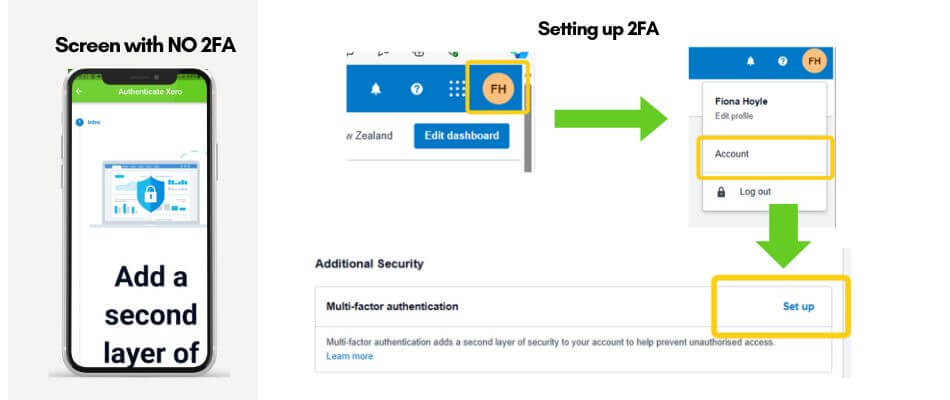
Note that Xero accounts need 2FA for third-party app connections like BOAhub. Without 2FA, you'll see a prompt when enabling integration. To set up 2FA, go to your profile (top right), click 'Account', then 'Set up'. Once done, you can seamlessly integrate Xero with the BOAhub
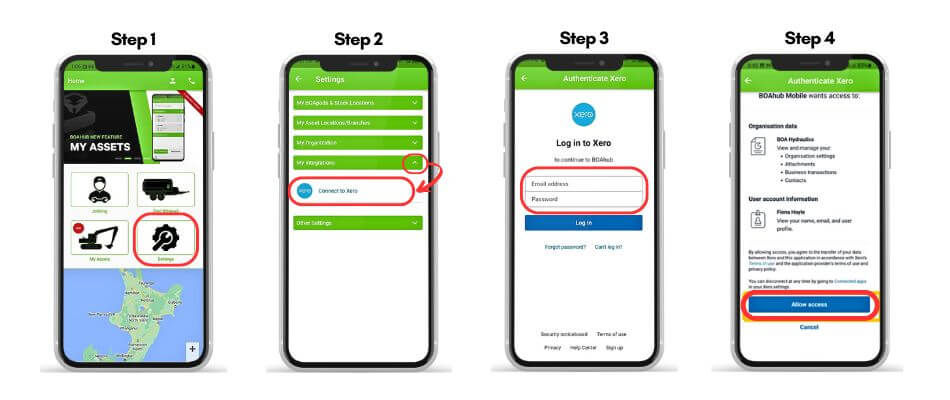
How to Setup Xero Integration with the BOAhub
- Step 1: Click Settings
- Step 2: Under 'My Integration', click 'Connect to Xero'
- Step 3: Enter your Xero Login Details
- Step 4: Select your Xero Organization and click 'Allow Access'
The BOAhub now shows a loading bar while it checks for and creates necessary GL Codes in your Xero Organization. If these codes don't exist, BOAhub creates them. If they do, BOAhub recognizes this and won't duplicate them. You can find the list of created GL codes and Product codes in a separate PDF.
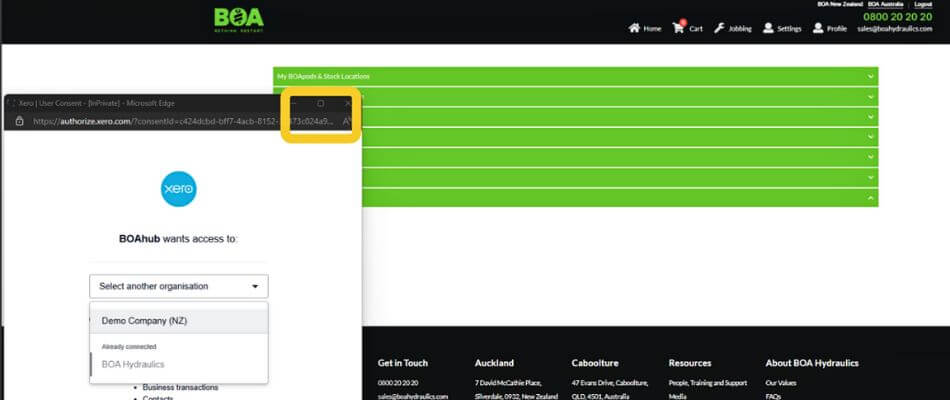
Regarding the BOAhub Website platform, a separate window pops up for Xero authentication functions.
Note: By default, the Xero window opens in a small size. Maximize it to access and use all its functionality, including a connect button that may not be visible in small mode.
To disconnect Xero from the BOAhub, simply navigate back to 'Settings', then 'My Integration', and click on 'Disconnect from Xero'.
Xero GL and Product Codes:
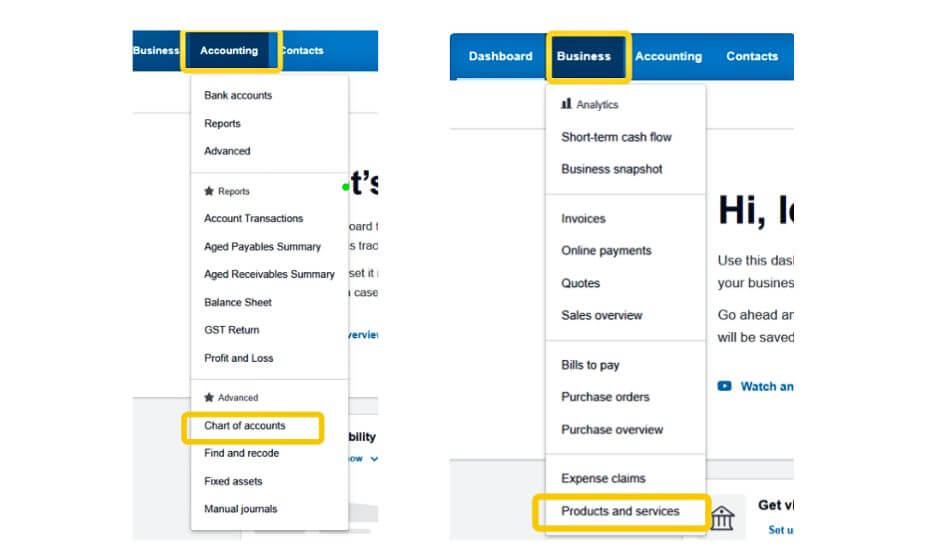
In Xero, all GL codes are found under the Accounting tab -> Chart of Accounts, while Product codes are located under the Business tab -> Products and Services.
Users have the flexibility to modify the GL code assigned to the Product Codes created by the BOAhub, as well as to delete the GL codes created by BOAhub. If a User removes the GL code assigned to a BOAhub-created Product Code without setting a new one, the default GL code will be applied when an invoice is generated from the BOAhub.
Conversely, if the User assigns a different GL code to a BOAhub-created Product Code, that specific GL code will be applied when generating an invoice from the BOAhub.
While users can delete a BOAhub-created Product Code from Xero, BOAhub will recreate it during the invoice creation process. It's important to note that only the Product Codes set by BOAhub will be used and passed from the BOAhub platform, meaning users must utilize these specified product codes.
BOAhub Job Card to Xero Invoice Integration
Here's the next step once the Xero integration is linked and the Job Card is moved to 'Completed Status': update the BOAhub Job Card.
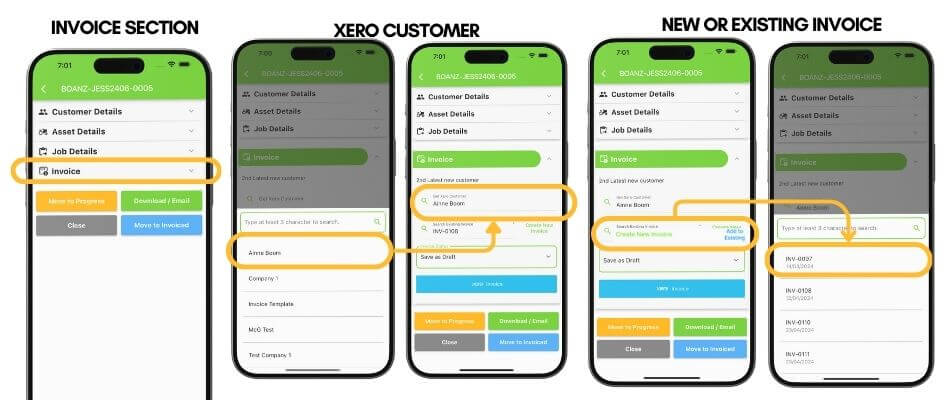
Invoice Section
- If you've connected Xero integration on your device, when a job card is marked as 'Completed', the Invoice section will appear. If Xero hasn't been connected, this section won't show up.
Xero Customer:
- Choose the customer from Xero for whom the job was done.
- The name displayed here matches what's on the job card.
New or Existing Invoice:
- Decide whether you want to create a new invoice or add it to an existing one.
- If you choose to add it to an existing invoice:
- A list of draft invoices for the selected Xero customer appears.
- Simply pick the invoice you want to add it to from this list.
- If there are no draft invoices for this customer, a message will let you know.
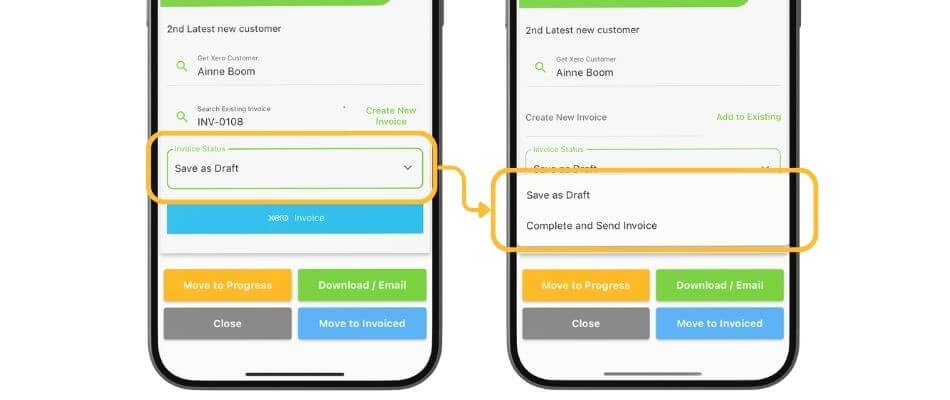
Invoice status: Choose what status you want the Xero invoice to be in, after you click Invoice button on the BOAhub:
- Draft - The invoice will stay in draft status, you can edit it further directly from Xero before it is sent to the customer.
- Complete and send - The invoice will be set to completed status, and automatically emailed to the customer when you click the Invoice button in the BOAhub.
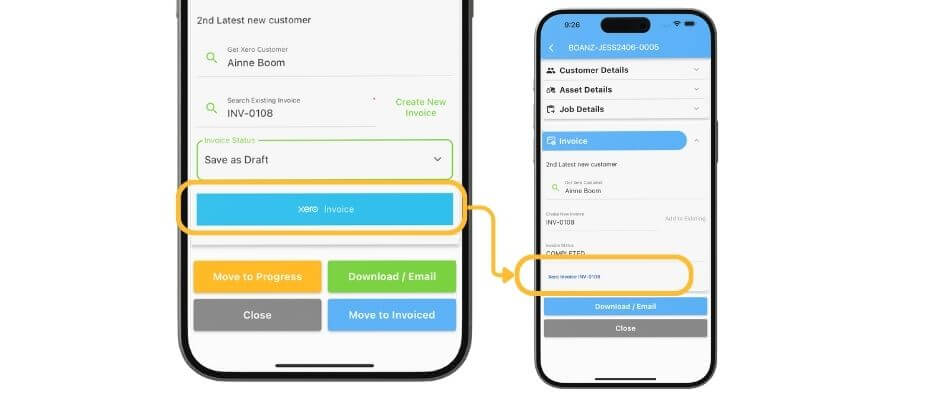
Invoice:
When you click the Invoice button, whatever you have set in the fields above will be applied and the integration initiated. The job card is then automatically set to Invoiced status in the BOAhub. A link to the Xero invoice is returned and displayed on the job card. If you click this link, the Xero invoice displays.
Note, this is a live link, so if changes are made to the invoice directly in Xero, these changes will display on the invoice when the link is clicked from BOAhub job card also
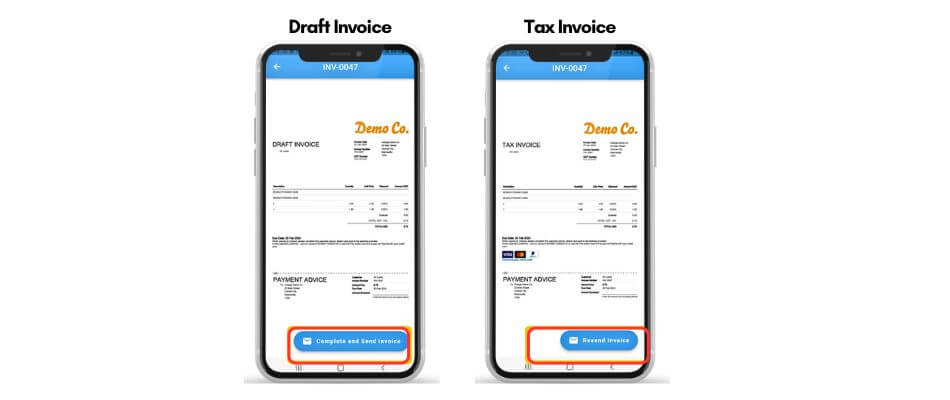
To Resend or Send an Invoice from BOAhub:
- Step 1: Click the Xero invoice link to view the invoice.
- Step 2: If the invoice is in Draft status, you'll see a "Complete and Send invoice" button. Click it to finalize the invoice in Xero and email it to the customer.
- Step 3: If the invoice is already Completed, you'll see a "Resend invoice" button. Click it to resend the invoice to the customer.
Job Card PDF Instructions
The job card PDF is attached to the invoice in Xero and set to be emailed to the client along with the invoice. Important Note: If you do not want the job card PDF to be emailed to the customer, follow these steps:
- Step 1: Set the invoice to "Draft" status.
- Step 2: Log into Xero.
- Step 3: Either remove the PDF attachment or configure the invoice to not include the PDF when sent.
By following these steps, you can ensure the job card PDF is not sent to the customer.
Fields Pushes From The BOAhub
.png)
.png)

.jpg)
.jpg)
.jpg)
GL Codes:
.jpg)
Product Code
.jpg)
Xero Data Flow Diagram
 (1).jpg)
Xero Frequently Asked Questions
1. How do I connect to Xero?
- Step 1: Click on Settings & Cascade the My Integration section
- Step 2: Click on the Connect to Xero button
- Step 3: Enter your Xero login credentials and click 'login' & then enter your 2FA code
- Step 4: Select the Xero organization you are connecting to
- Step 5: Click Connect & a success message will pop out
2. How do I disconnect from Xero?
- Step 1: Click on Settings
- Step 2: Cascade the My Integration section
- Step 3: Click on the Disconnect from Xero button.
3. Can I make a change to the invoice in Xero? Yes you can, as long as the Save as draft option is selected. You can then edit the invoice direct from Xero.
4. Can I send a copy of the job card PDF with my Xero invoice? A copy of the customer facing job card pdf is automatically attached to the Xero invoice, an emailed to the client.
5. Can I create a new Xero customer from BOAhub? No, new customers must be created in Xero, then they are available to be used from within the BOAhub.
6. Can I add a job card to an existing Xero invoice? Yes, by selecting the Add to existing invoice option you can add a BOAhub job card to an existing Xero invoice.
7. How do I save the invoice as a draft? Select the Save as draft option in the invoice section.
8. Can I send the invoice to my customer direct from BOAhub? Yes, by selecting the Complete and send option in he invoice section the invoice is completed and emailed direct to the customer. Additionally, if the invoice is saved as draft, it can be completed and sent to the customer by clicking the Complete and Send Invoice button.
9. Why is the Invoice section not displayed on my BOAhub job card? For the invoice section to be displayed on my BOAhub job card, the following must be effective:
- The job card must be in Completed status
- Your user must be an Owner or Admin user type (integration not available to Operator user type) Your Xero integration must be connected
- If the invoice section is not displayed, check the above settings are effective.
For any question, you may email us at sales@boahydraulics.com